Monday, 30 November 2015

Ground turkey is a weird kinda thing...consistency, unique scent too. I sometimes cook with it because I feel like it will be leaner than other meats but I don't overly adore it.  Just realize that it needs some serious, but serious seasoning to be tasty, otherwise so-so. Because I have some thawed, I thought of creating a rich Ragu...long simmered Italian flavours in Spaghetti squash boats, transforming the turkey into a wonderful thing!

Each squash will make 2 large boats.  Just cut in half, remove seeds, turn upside down on parchment paper on a baking pan and cook at 375 for about 45 min. Once cooked, just set aside and cool.

Turkey Ragu: plan on simmering this sauce for at least an hour, longer is better.

Sautee:
2 medium diced onion until golden (takes a while)
add 4-5 chopped garlic cloves
add lots of sliced mushrooms
tbsp. of crushed chili
salt and pepper

Once cooked and smells great, deglaze with some white wine
Add ground turkey meat and cook through (you can combine some Italian sausage here too)

Season with:
handful fresh chopped rosemary
handful fresh chopped thyme
about a tbsp. each, dried oregano and dried basil
good pinch of ground nutmeg (freshly ground if possible)
add I can of whole tomatoes, crushed the tomatoes in your hand
add about a 1/2 cup of milk or light cream
add some parma cheese into the sauce
Simmer the sauce on a very low heat for a long time...

Assemble the dish by grating the cooked spaghetti squash with a fork to pull it up from the skin.  It is always so fantastic to eat and "al dente" with a slight crunch. Make a bit of space in the middle of the boat to spoon in the ragu. Top with mozz cheese or a mixture of shredded cheeses and bake at 350 degrees for about 20 minutes or so until cheese melts.

This is a yummy low carb dinner, and even better for leftovers!


Thursday, 26 November 2015

This is a rich, hearty, decadent and creamy casserole for a cold winter's day.  It has a few steps to prepare but so worth it.  Based on a Gordon Ramsey recipe, this reminds me of a meal you would have in a steamy British pub. YUM!

Step 1: Poach the fish and create the basis for the flavourful sauce.  You will need a wide pan for this part. Heat to medium on the stove and combine:

Peel and quarter a large onion, stud a couple of cloves in 2 of the wedges.  Don't avoid this step, even if you are not a huge fan of clove.  You'll see why when you taste it!
Add 1 cup of 35 % cream and 1 cup of milk.
Add 1 bay leaf and a few sprigs of fresh thyme.
Once the "broth" is simmering, place 2-3 large filets of white fish in the sauce and poach.  I like haddock for this dish, holds up to the sauce and has a delicate mild flavour.
Also add a filet of shredded smoked fish to this.  Smoked Mackerel is delicious but stronger in flavour.  Smoked trout is amazing!
Let this pan simmer partly covered for about 5-6 minutes.  The haddock may not be cooked through but don't worry as the casserole will be baked.
Remove fish and strain the hot "broth" into a bowl and reserve.

Step 2: Make mashed potatoes, seasoned with salt and pepper and set aside. Make enough to cover the casserole dish you will use.  Before you add this layer to the casserole dish, you will mix in 1 egg yolk and about a cup of grated gruyere and cheddar cheese.

Step 3: Making the cream sauce
Sautee 2-3 finely chopped leeks in 2 tbsp. of butter until tender and golden-ish.
Chopped fresh thyme is a delicious herb to add
Add a bit of white wine to deglaze the pan.
Add 2 tablespoons of flour and cook out a bit.
Then add the reserved creamy broth and stir until thickened.  Make sure to season.

Step 4: Finally!
Pour the sauce into your casserole dish or stove-to-oven pan and combine with the fish either shredded or in chunks. Fold in a big handful of fresh chopped parsley.
Add the cheese and egg yolk to the mashed potatoes and then smooth over the fish. Actually, I like peaks and valleys so that there is some texture to the topping.
Sprinkle a bit of paprika on top ( I put paprika in everything...remember!)

Cook the casserole for about 30 minutes at 325 degrees.  At the end when bubbling, I usually broil it for a couple of minutes for extra crispy, cheesy pizzazz.

This hearty rib stickin' meal is great served with peas or green beans.  And makes fabulous leftovers too!  On a cold day, think of this decadent dish!


Sunday, 22 November 2015

So, I'm no baker, this we all know.  And I've made a million different pumpkin muffin recipes, most to no avail.  But, this is the one, perfectly light and well spiced.  Add raisins or chocolate chips for an extra bit of fun...a Sunday morning treat. Feel free to pump up the volume on the spices!!

Pre-heat your oven to 400 degrees.  I use muffin paper cups.

1 cup all-purpose flour
1 cup whole-grain flour

1 teaspoon baking soda
1/2 teaspoon baking powder

1/2 teaspoon salt

1 teaspoon ground cinnamon

1/2 teaspoon ground ginger

1/4 teaspoon ground cloves

1/8 teaspoon ground nutmeg

3/4 cup packed dark brown sugar

3 tablespoons maple syrup

1/4 cup canola oil

2 large eggs

1 cup canned pumpkin

1 teaspoon vanilla extract

3/4 cup low fat buttermilk
 
Make your own buttermilk by adding lemon juice to the milk and let stand for about 5 minutes.

 
In a medium bowl, whisk together the all-purpose and whole-wheat flours, baking soda, salt, cinnamon, ginger, cloves, and nutmeg.

In a large bowl, whisk the sugar, maple syrup, oil and 1 egg until combined. Add the other egg and whisk well. Whisk in the pumpkin and vanilla. Whisk in the flour mixture in 2 batches, alternating with the buttermilk. Whisk just until combined.

Pour the batter into the prepared muffin pan. Tap the pan on the counter a few times to remove any air bubbles. Bake for 20 minutes or until a wooden pick inserted in center of 1 of the muffins comes out clean.


Sunday, 15 November 2015

This is what you make on a Sunday morning after a late night out...comfort food, easy, (a one bowl wonder) light and satisfying. If you eat one, you can eat 100!

Pre-heat your oven to 400 degrees. "Pametize" your 12 muffin tin.

  • 1 cup cottage cheese (no butter, no oil...super!)
  • 4 eggs, lightly beaten
  • 1 cup flour ( I do half white and half whole wheat)
  • 1 teaspoon baking powder
  • 1/4 teaspoon salt
  • 4 ounces ham, diced (bacon, salami, sausage, pepperoni would also be yummy)
  • 1/2 cup cheddar cheese, shredded (any sharp cheese works, gruyere is great!)
  • 3-4 green onions, diced
This muffin can take lots of herbs and spices if you want to doctor it up.  I think any flavour combo you love would be great. I like paprika or chili peppers, jalapeño peppers or sweet red peppers are great too.  
  1. Mix the cottage cheese, eggs, flour, baking powder and salt followed by the ham, cheddar cheese and green onions, pour into a greased 6 or 12 muffin pan and bake in a preheated 400F/200C oven until golden brown and a toothpick poked into the centre comes out clean, about 25-30 minutes.

Monday, 2 November 2015

The tangy bite of this vinaigrette coupled with its maple sweetness is simply addictive. Make a double batch in a large mason jar and it keeps for eons in the fridge. You really need to blend this concoction to emulsify.  A magic bullet or immersion blender works great.

3 tbsp. Apple cider vinegar
2 tbsp. fresh grated or jarred hot horseradish
1 tbsp. Dijon mustard
1 tbsp. mayo
1 tsp. maple syrup
1 minced clove of garlic
1/2 c. olive or canola oil, or a mix of the 2
salt and pepper to taste

Wiz this up and pour over roasted root vegetables ( parsnips, carrots, sweet potatoes, squash...) roasted Brussel sprouts and beets, roasted fennel and onion...roasted anything!

This is beyond delicious.

Sunday, 1 November 2015

This pie is a riff on a classic Canadian dessert.  It is too easy for words and is ridiculously delicious.  I mean, who doesn't love Nanaimo Bars, and imagine, it's a stinky hot summer day and you serve this ice cream marvel to the crew! The first time I tasted it a Suzie and Tassie's (our family cake Queen!) BBQ, I just couldn't believe how good it was...and so I've made it so many times since, and will throughout the winter too.
 
Make your regular Graham cracker crust by adding the chocolate, coconut and ground nuts, I used pecan, but walnut is yummy too. Get your pie shell ready by spreading the crust in the pie pan.  No need to cook!!!
 
Get great quality vanilla ice cream.  I love Chapman's French vanilla.  Leave the ice cream out to get a bit soft and add 3 gigantic heaping tbsp. of the powdered custard and stir it all in until well combined. Place this into the pie crust smoothing it out and freeze for a couple of hours.
 
Make the chocolate ganache topping by combining melted chocolate, I like Baker's semi sweet, and cream. Once creamy and cooled a bit, pour it atop the frozen pie and then freeze again till everything sets. Will need another hour or so.

KEY- do not cover your pie when freezing. Saran or similar will inevitably stick to the chocolate take on a plastic-y taste.So, don't bother.


This pie won't last for 2 minutes...better make 2 of them!!  Out of control. Really.
 
  • 3/4cup  graham cracker crumbs
  • 1/3cup sweetened shredded coconut (I put more!)
  • 1/3cup finely chopped or ground walnuts or pecans
  • 1/4cup cocoa powder
  • 1/4cup granulated sugar
  • 1/3cup butter, melted
  • 3 tbsp. custard powder, (such as Bird's Traditional)
  • 4cups (1L) French vanilla ice cream, softened
  • 55g semisweet chocolate, (about 2 oz), chopped ( I double this!)
  • 1/4cup whipping cream 35% ( I double this!)

Thursday, 29 October 2015

If you have 4 minutes, you can make this pie. This is not a real recipe... its just a quick "put together" pie, and so delish in the height of strawberry season. 

We are so lucky to live within minutes of a fabulous U-Pick farm and recently came home with a few pounds of very sweet hand picked strawberries.
So, here you go.

Buy ready-made (Tenderflake) pie crust and cook- 400 degrees for about 15 minutes
Make Bird's Eye custard. Cool and add a capful of Almond extract.  Crucial!
Add the custard to the pie crust.
Mix strawberries with a bit of apple jelly or strawberry jam for gloss, and place on top of the pie.
Chill it and eat!

Boy oh boy...not much simpler than that.  And so scrumptious!
It's lunch time at the cottage!  While visiting our favorite T-bombs at their wonderful cottage this past summer, we indulged in a simple yet beloved lunch... Havarti Grilled Cheese on Challah Bread.

This is the epitome of gooey comfort food, and yes, there's a bit of technique involved when you watch Bubby put it all together. The creaminess of the Havarti cheese coupled with the sweetness of the egg bread and saltiness of the butter is a unique flavour you will become addicted to, for sure!

Get the very best fresh loaf of sliced Challah bread you can find, and pull out the biggest slices from the middle! Slather butter on both sides of each slice for the sandwich.  In the meantime, get a big skillet on the stove and heat to medium. 

Place one piece of each sandwich bread into the skillet layer a few slices of Havarti cheese on each slice.  Then cover each sandwich with the other slice.  Once golden brown underneath, flip the sandwich and now COVER the pan...steaming and melting the buttery cheese and caramelizing the bread and the glorious aroma of buttery heaven begins to waft.

Lunch is ready!  Get ready to make a few more sandwiches than you think as there never seems to be enough!!!

What a treat, thank you Bubby!

Tuesday, 23 June 2015

Eggplant parma is a labour of love. Everyone knows that a GREAT eggplant parmesan has breaded, seasoned eggplant.  All other variations that try to avoid the breading just don't cut it for me. So, in an effort to still get that great taste without all the oil and frying, I bake the eggplant.  Here's my lightened up version of this dish that still imparts that "old world" deliciousness that makes eggplant parma one of our true and ever-lasting faves.

Pre heat your oven to 375 degrees, convection if you have it.

Eggplant: Using 2 medium fat purple eggplants, I like to remove most of the skin because for me, it tastes quite bitter. Slice fairly thin circles and forget that salt sweating procedure!  The KEY for great baked eggplant is the seasoning, so here it is:

In a large bowl, combine:
3/4 cup of panko bread crumbs, whole wheat if you have it.  I love panko, seems to make anything breaded much crispier.
1/2 cup of almond meal
1/2 cup of corn meal
1/2 cup of grated parmesan cheese
Then add to taste ( I add lots of each) : dried oregano, dried rosemary, garlic salt, paprika, salt and pepper

Mix 2 eggs in a smaller bowl for the first dredge of each piece of eggplant.  Then dredge each circle into the breading and place on a cookie sheet, lightly oiled or Pam'd.  You'll probably need 2 cookie sheets. This bakes for about 30-40 minutes, tuning them halfway through so each side gets nice and golden. What a great aroma while baking!

Meanwhile...make the Marinara sauce. NO ONIONS! And, 1 can of tomatoes is enough for this recipe.
In oil, sauté several chopped cloves of garlic, I use 4-5 cloves per can of tomatoes
Add chili peppers to this
Once golden, add 1 can of tomatoes, either whole or diced and mush.
Add salt, pepper and oregano
Let it cook for a few minutes and then turn it off.

Next, I love to add "light ricotta" to this dish that gets dolloped on in 1 layer. Season the ricotta with 1 egg, fresh roughly chopped basil, some parma cheese, salt and pepper. So fabulous!

This parma is loosely put together as opposed to a dense assembly. First, put some sauce on the bottom of your baking pan.  Then place a layer of eggplant. Now dollop a few spoonful's of the ricotta over the eggplant.  Loosely add more sauce over this and then another eggplant layer.  Over this, spoon more sauce and add some shredded mozzarella. Then the last layer of eggplant. Spoon the last of the sauce over this layer, add some shredded mozz, whole leaves of basil and lastly, some fresh mozz (bocconcini).

At 350 degrees, this can bake for about 30 minutes and then check.  You may need up to 50 minutes depending on your oven.  You will know when its bubbling and done and everything is melted and fabulous.

I often bake this dish well before serving, or even the day before.  Then I re-heat to serve.  The longer it sits, the better it tastes!

It takes time to make a great parma...but so worth it! Indulge!


Wednesday, 3 June 2015

I'm not really sure how this name came up for this casserole.  I think we decided while eating the concoction because it has a southwestern kinda taste to it and it's great with hot sauce. A riff on a traditional Shepard's Pie or in bon Quebecois...fabulous Pate Chinois!

I was thinking of a TWIST to this traditional dish without beef and potatoes and have come up with many different takes over the years, all while keeping its essence. This is one we enjoy a lot and packs in lots of good stuff...veggies, ground turkey and topped with mashed sweet potatoes. The KEY is dried summer savory.  If you don't have this herb, go and get some.  It really determines the specific flavour.

Have a casserole dish ready for assembling.

In a large pan, sauté:
1 large diced onion
2 sweet peppers, cut in big chunks ( I like red and yellow- avoid green unless poblano, the only delicious sweet green pepper in my opinion)
lots of chunky mushrooms, cremini are fun
a couple of stalks of chopped celery
1-2 crushed cloves of garlic
some hot sauce...I love Frank's! ( put that ^&%% on everything!)
Summer savory, oregano, salt and pepper

Add the ground turkey (1 packet works well, about a pound?) and cook through

Add:
a good dose of ketchup (the vinegary sweetness really works here)
some chicken stock
several dashes of Worcestershire sauce (adds depth of flavour, umami)
Taste as you go and add more...

Pour this mixture into the casserole dish.  It will be the first layer.

Next layer, corn. A combo of frozen (thawed) and 1 can of creamed corn is best.  Or, just one or the other, whatever you have.

Last layer, sweet potatoes.  Steam or boil, and mash with a bit of butter, salt and pepper.  Keep the skins on for best flavour!

Bake at 350 degrees for about 35-40 minutes or so. 

Serve with Ketchup of course!!!!!!!

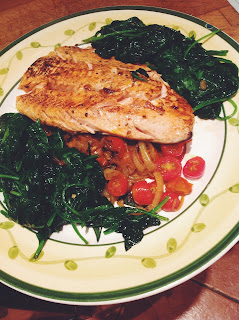
WOW, who knew? I guess a lifetime of hanging out in his family kitchen combined with an innate global sensibility lead my son to create unbelievable flavours and presentation in this glorious dish, and with such ease!

As this dish came together, the aroma of caramelized onions and sensuous saffron butter lingers now in my memory. So, here it is, so easy and quick to prepare:

This is a one pan meal, so you will need a large non stick skillet, big enough to sauté vegetables and sear a medium size salmon filet (serves 4 people).

Sauté in olive oil on medium heat:
2 small onions, cut them in long thin slices
2 cloves of slivered garlic
several cherry tomatoes, cut in half. It's nice if you have red and yellow ones...
Add a sprinkle of cumin, turmeric, salt, pepper

In a separate small pot, melt about 1/4 cup of butter and once melted, put a few strands of saffron in the butter and let sit for a couple of minutes and the butter will turn a golden yellow.  KEY- you really need the good stuff here, so use authentic saffron, ex: Iranian. Spend the bucks, it's expensive but it last a very long time and there is no replacement for the unique deep flavour of this spice.

Turn up your heat a bit and move the veggies to one side of the pan.  Place the salmon in the pan, skin side down. Season the top with some salt and pepper and now...spoon the saffron butter on top of the salmon and on veggies.  Once the salmon is cooked (will be rare to medium) plate the fish and veggies on a nice big platter, side by side.

In the same pan, put a heaping amount of fresh spinach and sauté as it will quickly wilt and absorb all of the pan flavours. The spinach is then placed on the other side of the same platter and voila!

Not only is this dish splendid to eat, it is gorgeous to look at too. " Not because he's my son" (ha-ha)but this was truly one of the tastiest fish meals we have enjoyed!  Delectable!  Bravo!

Yia'sta heria sou!! (bless your little hands)


Thursday, 28 May 2015

Cozy Corn Chowder...a late summer soup, smooth and luxurious! And, it comes together quickly.  It's especially great if you don't know what to make for dinner and you have a couple of potatoes and some corn hanging around. (fresh corn is best but frozen is great too...delish either way!)  There are a gazillion recipes for this soup but the one I've settled on now is a lighter version with all the punch of the cream loaded one.  The KEY to my soup is OLD BAY seasoning and dried tarragon, a unique flavour combo that is a must in any chowder!

In a soup pot, sauté the in olive oil and butter:
Lots of diced leek or French shallots. If using leek, about 3 stocks, such a mellow flavour!
***a note about leek. I learned about this trick from Cheffy Alvaro when cooking with him in his kitchen.  Cut the leek before you wash it.  Usually lots of grit and grime in leek and in all its layers, so get a big bowl and throw in the chopped leek, swirl around and drain.  Pat dry before you use it. 
2-3 stalks of finely diced celery 
( another MUST for the best flavour, and this is true for most soups)
Add small handful of fresh thyme, rosemary if you have it, and 1 clove of crushed garlic.
Sprinkle a heaping tablespoon of flour into the pot and mix for a couple of minutes to cook down. This will help thicken the soup.

Add a healthy splash of white wine to deglaze, and then add 3 cups of milk. ( I have used everything from skim to whole milk, and I like 2% best.) Bring to a boil while stirring and it will thicken nicely.  Turn down the heat to simmer and add 2 cups of chicken broth, 2 cups of corn and a couple of small diced potatoes, skin on or off.  Let simmer for a while till everything cooks through. This is when you can add a heaping tablespoon of OLD BAY seasoning.  Now it's really a chowder!

Once done, you can serve as is or you can add some "velvet".  Remove about a cup of soup into a deep bowl and puree with a hand mixer.  Once smooth, add this back into the soup pot for a thicker base. Then serve topped with  chopped chives.


TASTY TWIST- add chunks of bacon and everyone (non veggies) will love you even more! Sauté the chunks of bacon in the soup pot before any of the veggies. TIP: add a bit water when cooking bacon and it will brown beautifully and never burn. Discard most of the bacon fat but leave a bit in the pot to sauté the veggies.  Keep the cooked bacon on the side and put on the soup when serving. YUM!!

Side dish: Honey Cornbread (muffins or loaf) With butter...this is to die for!
Preheat oven to 400 degrees F.

1 cup yellow cornmeal
1 cup all-purpose flour ( NOT whole wheat...doesn't work here)
1 tablespoon baking powder
1/2 cup granulated sugar
1 teaspoon salt
1 cup whole milk
2 large eggs
1/2 stick butter, melted
1/4 cup honey
In large bowl, mix the cornmeal, flour, baking powder, sugar, and salt. In another bowl, whisk together the whole milk, eggs, butter, and honey. Add the wet to the dry ingredients and stir until just mixed.

Spray muffin tin and fill the cornbread mixture into each cup. Bake for 15 minutes, or until golden. If using a loaf pan, you will need to bake until the toothpick comes out clean, so check after 15 minutes but will probably need more time. 

These are the BEST corn muffins.  For a more savoury feel, I also add black pepper and dried thyme, just great!


Monday, 27 April 2015

When you visit Deauville/Trouville (two beautiful towns linked by a bridge) on the coast of Normandy, France, you imagine the Parisians of the roaring 20's on holiday, with its wide sweeping beaches, never-ending boardwalks, magnificent Casino's of past, woman clad in striped bloomers and big floppy sun hats under huge pastel coloured parasols. Add a little music and laughter and you get the picture.  What is most memorable for me is the sublime taste of the freshest cold water seafood. The very best kind.  The most beautiful kind. Couple this with Normandy's rich cream, (crème fraiche) butter and brine and you have heaven. Above all however is visiting this marvellous place with your Mom, sister and daughter and now you have total perfection!!

Coquille St. Jacques is not the saucy seafood dish we know, but the name of a most glorious shellfish, albeit a humongous scallop with its roe. ( yes, I actually took this photo!)


And, the magnificently displayed fish market in Trouville... mouth watering!

 
Dining on briny mussels and Cabillaud en crème (freshest of cod cooked in crème fraiche- beyond words) was a definite highlight for my palate, with a cold glass of Muscadet of course!


Sunday, 26 April 2015

On a particular rainy spring day, the phone rang... it was my son calling from Tuscany as I was making this soup, how crazy is that!!! Karma.  I suppose he was really on my mind and he inspired me to want to re-create certain Italian aromas and flavours in my own kitchen. This is a earthy soup... even better the next day, and the day after that! You really do need a cold and rainy day to make this soup, it fills the house with warmth and happiness. The KEY to the depth of flavour is the ROSEMARY!

Overnight, soak 2 cups of any small white bean, so navy, cannelli etc. Make sure to have at least 3 inches of water above the beans as they really do expand.

In a large Creuset or soup pot, sauté:
2 large diced onions
2 larger diced carrots
1 large red pepper
2 or 3 ribs of diced celery
3 minced cloves of garlic
Some paprika (put paprika in most anything you cook... adds great depth)

Add 1 tbsp. Chilli flakes, 2 tbsp. dried rosemary (needs to be dried) and 2 tbsp. dried or fresh thyme.  Now the house is singing!
Let all of this meld on a medium heat.

Then, add half of a large can of diced tomatoes, and add the pre-soaked beans. Cover the mixture with about 5 cups of chicken stock or vegetable stock. Add  a couple of bay leaves.  Bring to a boil and then let simmer slowly... for HOURS! You may need to add water at some point if it gets too thick. Once the beans are cooked through, remove about 1/3 of the soup and blend or purée, and add back to the pot.  This gives it a nice velvety background texture.

At this point, add a package of frozen chopped spinach (better than fresh in this recipe) and wow, this really lifts the soup to another level.  Also add about 1/4 cup lemon juice or juice of half a lemon. This really brings it all together, ties the flavour loop!

I like to serve this soup with shaved Parma on top and a warm loaf of the Spelt Bread. The rich and earthy flavours will take you to Italy... even if only in your mind. It's so worth it!
In Normandy, we had the honor of dining on many phenomenal meals prepared by our Tante Suzanne.  I can distinctly remember the unique and rich flavour of this homemade mayonnaise when she would come to visit us from France. No other version tastes like this one... and I've tried and failed at quite a few. Recently, we had the pleasure of making it with her in her kooky Normandy kitchen, and it was even more fun listening to the instructions in her most poetic French vocabulary.  All food and recipes sound better in French. Like velvet! The KEY is the peanut oil ( I never knew this!!) and Lesieur, I am told is the very best authentic French brand.


So, in a glass bowl, must be glass... whip with a hand mixer, or whisk if you are a very fast whisker only, the following... and very carefully:
 
1 and 1/2 egg yolks
1 tsp. Dijon mustard
Whip for a minute or so
And then, begin adding the peanut oil, literally drip by drip while whipping. Once the mixture starts to emulsify ( there's that great word again ) let the oil drip in a slow continuous drizzle. Add a tiny bit of lemon juice and salt to taste at the end. Stop when the texture is luxuriously thick and the color will be a rich deep-ish yellow.
 
This special mayo adds a particularly "golden" flavour to many dishes, either as a light spread and base for hors d'oeuvres, aioli, rouille for French fish soup or any other need for an unctuous condiment.
 
It is glorious. We are so grateful to have made this with our beautiful sophisticated family chef...Tante Suzanne.  It was a great and memorable moment.


We attribute this delicious salad to our friend Anne Marie, who is a glorious cook.  We also decided today that all my food pics are awful and so my daughter will be the new photographer and photo editor! (you'll be able to tell which are mine and which are hers!!)

Such a simple and yummy salad on the lighter side but super punchy in taste!  

Steam or boil nice white or yellow waxy potatoes. In the meantime, make the dressing which is really just a wonderful Dijon vinaigrette. The KEY to this dish is to dress the potatoes when they are hot so they soak up all of the delicious zumi.

Dressing: make this in a mason jar so when you shake it all up, the dressing will emulsify.
1 part white wine vinegar
3 parts canola and olive oiled mix
1 clove of garlic
I tsp. Dijon mustard
Salt and pepper to taste
If you want to be wild, add a hint of horseradish!


Chop many capers and lots of fresh crunchy watercress, leaves and stems. Gently fold everything together and devour.  This is a great side dish... fresh and light. 

Thanks AML for giving us an SCB often specially requested favorite!

Monday, 30 March 2015

Yottam Ottolenghi and Sami Tamimi developed what I think is the most fabulous series of books on food. These books are so much more than "cookbooks", they are spectacular... you almost want to eat them. In fact, our dog actually tried. In particular, there is an inspiring Forward in the " Jerusalem" book that will lead you to really appreciate hummus and its origins! There are millions of versions of Hummus depending on geography. No matter which hummus I make, it's always served with a generous drizzle of extra virgin olive oil and cracked black pepper.


Here are a couple of my faves:


Rosemary and Lemon Hummus- in a food processor, blend 1 can of drained and washed chickpeas with about 1/4 cup + of Tahini. Add 1 small clove of garlic. Drizzle in some extra virgin olive oil. Add the zest from 1 lemon, juice of half a lemon, a small handful of fresh rosemary leaves, a few good shakes of ground cumin, salt, and pepper. Blend for a while until smooth...taste as you go in order to adjust seasoning. If thick...add a bit of water or more oil until nice and smooth.


Turkish Hummus- we ate so much hummus in Turkey, and it always tasted different. When we try to re-create what we remember, the intensity and richness of the nutty chickpea flavour is pure Turkish delight. The KEY is a grittier texture and the use of very little tahini than most hummus recipes.


So, for this version of hummus, use fresh chickpeas. Soak 1 cup of chickpeas overnight and then boil for about 1 hour or until soft, may take a while.  Reserve some of the cooking water or "zumi".  Blend the chickpeas and add a bit of Tahini just to get the taste in there, maybe a couple of tbsp.  Add salt and pepper, 1 clove of garlic, some ground cumin and lemon juice. Use the cooking water "zumi" to get the blend going and taste as you go.  Don't over mix. It will be thicker than what you may be used to with a nuttier flavour. A garnish of fresh coriander is great with this one. Divine!!!


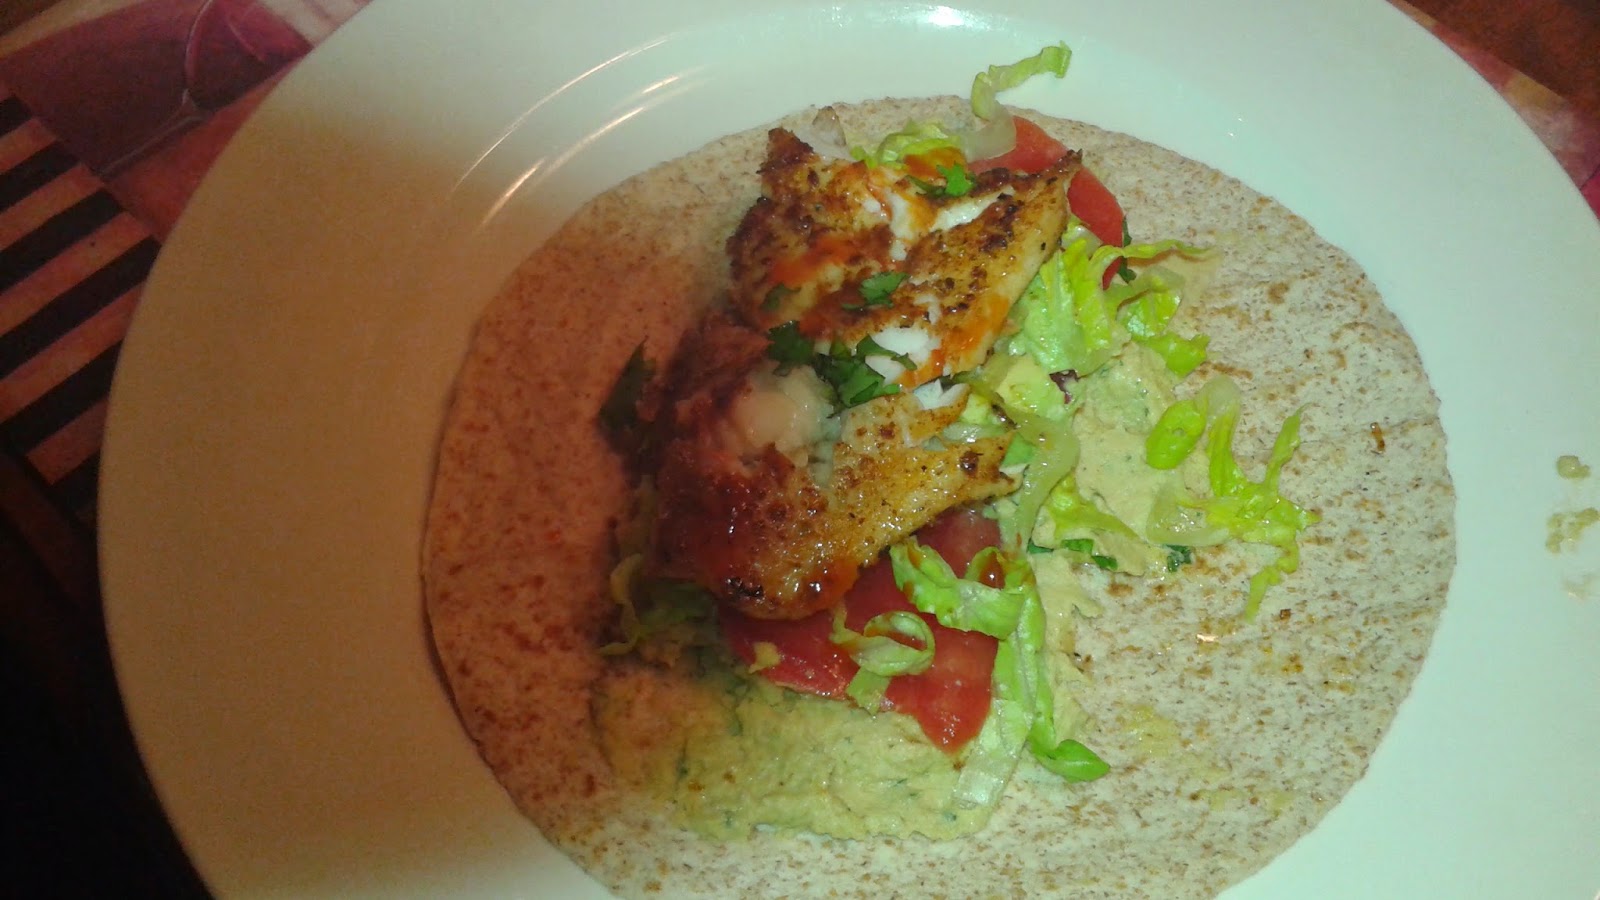
I remember the first time I ever had a fish taco.  It was nirvana. Ever since, I have re-created this yummy thing in various way and just love the brightness of fish tacos full of warm Mexican/Mediterranean flavours and the freshness of everything that goes along with them.


You'll need some whole wheat, multigrain or soft corn tortillas simply because they taste so much better than the white ones- refined flour mush type...yuk.


I like to use a firm white fish such as bass, haddock, or any of your similar faves. Season the filets with salt, pepper, paprika, ( I put paprika in just about everything) ground cumin, dried oregano and chili powder.  If you can find it in a Latino grocery store...add some "Tajin"- a tangy lime and chili spice mix, out of this world!


In a non stick pan, sauté the fish in a bit of canola or grape seed oil that can tolerate higher heat. I also like to add a dab of butter in order to get that crusty slightly seared thing going on.  Flip the fish and cook for a few more minutes until the sides become somewhat opaque. Either finish in the oven for a few minutes or cover the pan on the stove for about 5 minutes.  That's it!


Now for the sides...


Chopped crispy lettuce or Homemade coleslaw- finely sliced cabbage of any kind and colour, shredded carrot and finely sliced red onion.  Add some shredded green apple if you have it...delish. Keep it simple.  Dressing: mix about a 1/4 cup of mayo, same of Greek yogurt, big tsp. of Dijon, splash of apple cider vinegar, couple of drops of Worcestershire sauce and a squeeze of agave, maple syrup or honey to taste for a hint of sweetness. Salt and pepper. Whisk together and fold in the slaw.


Slices of ripe avocado are delicious or make Laura's Authentic Mexican Guacamole: 3 large avocados mashed with a bit of olive oil for smooth and emulsified texture, 1 small seeded and diced tomato, 1 finely chopped jalapeno pepper ( with or without seeds depending on your spicy taste buds) a handful of finely diced red onion and chopped cilantro...lots!  NO LIME, NO GARLIC...and this, authentically Mexican.

Punchy Pineapple Salsa!
Diced pineapple. Diced jalapeño pepper. Red onion. Cilantro. Lime juice. Salt. 


Try Rosemary and Lemon Hummus (see post)


Lay out all of the sides and build your own taco. You will make these over and over again and find all kinds of ways to experiment

It's a fun meal!


Wednesday, 25 March 2015


Mom creates culinary beauty and taste with the simplest of ingredients...everything is always lovely on her table. This fresh and light recipe is beautifully presented as either an appetizer or lunch. 

You will need 6 tomatoes: the KEY is to turn the tomato upside down and lop off the top of the bottom end, Scoop out the middle. This way they will sit up better with the stuffing. Keep the top for later.


Prepare the shrimp filling:

1 1/2 cups of small shrimp. Either fresh or thawed from frozen will work. Wash and towel dry well.

In the bowl of shrimp squeeze in some lemon juice and then add:

Finely chopped shallots, chopped celery, parsley, 1 tsp. ketchup and 1 tbsp. mayo to coat the shrimps.

Fill the tomatoes and top each one with the cut out piece of the tomato.  Garnish with fresh basil.


Arrange the tomatoes on a nice tray on a bed of lettuce,. Slice a few cucumbers and add some kalamata olives. Also add slices of avocado and slices of feta cheese (optional)  Endives are a nice garnish too.


This dish can be made with chicken salad or tuna. Do not put the ketchup with these though. In the chicken salad add some dill. Capers are great with tuna. Don't forget the lemon juice!


If there is one dish for which my Mom is world famous, this is it.  Galaktobouriko...a refined Greek dessert when well made. No honey here, no thick filo!  This is Mom's true blue recipe, more delicious than any other dessert you will ever eat. (except maybe for Mom's Swedish Cream...saved for another post!) 


1. 5 to 2 lbs. filo (try to find fresh or thaw frozen, 1 package is 1 lbs.)

3/4 cup sweet melted butter

4 cups milk

1/2 cup sugar

1/2 cup cream of wheat

1/2 tsp almond extract 

1 tsp vanilla

4 egg yolks

1 teaspoon Amoretto liquor (optional)

piece of lemon wedge


Method:

In a saucepan heat milk, add sugar, cream of wheat and a piece of lemon wedge.

Stir continually until thickened.

Add: vanilla and almond extract

Remove lemon wedge and let mixture cool entirely. This can be made the day before.

When cooled add slightly beaten egg yolks, 1/3 cup melted butter and Amoretto (opt)

Mix well...


Butter each piece of filo and fold in1/2. Then, cut in half. 1 filo makes 2 individual pieces of Galaktobouriko.  You may need almost 2 lbs . of filo for this recipe.


Put 2 tablespoons of filling on each piece of filo. Then, fold first from the bottom and then fold in sides and continue to roll until the piece is closed. (see photo) 


Brush the top of each piece with melted butter and place in ta upperware. Arrange side by side and keep frozen.


Syrup: in a saucepan...

2 cups sugar

2 cups water 1/4 of lemon

1 cinnamon stick

Boil for about 20 min (must be a little thick) Cool and store in a jar in the fridge with the lemon and cinnamon. Use as needed.


To assemble the dessert, take out as many pieces as you want and bake them from frozen at 350 degrees until golden and well done, about 1/2 hour.  


Pour about 2 tablespoons of the cold syrup on hot galactobouriko and sprinkle cinnamon on top, also some ground pistachios are delicious.


This is a fabulous dessert that will allow you to become world famous too!


I used to make this bread a long time ago and it resurfaced while looking at some of my older recipe logs. So, I'm reviving it...this is a surprisingly delicious bread that is ready to eat in about 30 minutes.  It's especially good and moist considering that here is no butter or oil...the KEY is the nutty flavor imparted by the spelt flour and all of the crunchy seeds.  This is again becoming our favorite last minute go-to bread, and super healthy.


Preheat oven to 400F


Combine:
1½ cups whole spelt flour
½ cup rolled oats
1 tsp salt
1 tsp baking soda
¼ cup + 1 tbsp mixed seeds ( I use way more, love the crunchy factor)
Add 1 cup buttermilk ( just make your own, 1 cup low fat milk and 1 tbsp. of lemon juice or white vinegar...let it sit for 5-10 minutes)


Remember not to over mix. Add the buttermilk and gently stir until well combined. Also, use a variety of seeds. I always include lots of toasted sesame seeds and then whatever I may have...raw pumpkin seeds, toasted sunflower seeds, poppy and chia seeds etc.


Sprinkle some seeds on top of the bread before it goes into the oven for 30 minutes.  Don't overcook!


Then, next time, experiment. The photo has kalamata olives and sun dried tomatoes. I have added dried herbs (thyme, rosemary etc.), nuts (toasted pecans, almonds), dried fruit (cranberry, dates, currents, raisins) all delish!


This bread is so good! You'll be on a kick making it often once you start


Thursday, 19 March 2015


There are certain comfort foods that we just can’t veer from, even when we try.  I’ll start off thinking that some kind of a curry would be delicious tonight for dinner...look at myriad recipes and then just make Vij’s curry again...and again, and again. Thank you Vikram Vij- the great Canadian chef. This curry is a staple in our kitchen and once you savor it, you’ll know why. Let’s not even talk about the spectacular aroma. I confess, a pot of this curry is cooking as I write this post...


Lots of prep...

Dice 2 large onions

1 cinnamon stick

Get that going in a large pot with some canola oil, a “ Crueset” or Dutch oven is best. Sauté until just golden- I promise, the best aroma begins right here!


Prep and keep separately:

Chop or grate 3 tbsp of garlic, 2 tbsp of ginger, and dice 2 large tomatoes


Prepare spices in 1 small bowl:

¾ tbsp salt

½ tsp black pepper

1 tsp turmeric

1 tbsp ground cumin

1 tbsp ground coriander

1 tbsp garam masala ( try making your own some day....amazing!)

¼ tsp cayenne pepper


So, once the onions are done, add garlic and cook for a couple of minutes.  Then add ginger and all of the spice mixture. Combine well, and then add the tomatoes.  Let this “masala” mixture cook for a few minutes until you see the oil separating in the pot...the house now smells divine!


Add chicken thighs.  I use the skinless de-boned ones, approx 8 will do and cut in pieces is even better.

Let this simmer on a low temp with the lid on the pot for about 10 minutes so the chicken cooks through. Once done, add 2 cups of water (I always add a bit of chicken stock) and 1 cup of sour cream, low fat works fine. (Greek yogurt is good in this dish if you want a substitute)


This needs to simmer for a while, say 40 minutes or so.  Funny that Vij’s recipe says it’s ready at this point when it never is.  Almost at the end, I usually add a slurry of cornstarch ( so 1 tbsp of cornstarch diluted in a tiny bit of water) so the sauce thickens a bit. Serve with basmati rice cooked in water scented with cardamom seeds and 1 bay leaf, and freshly chopped cilantro.  A good dollop of Greek yogurt is always delicious on the plate with a side of green peas!  I love a buttery glass of Chardonnay with this but a fruity red works great too.  It’s a lip smacker!!


Wednesday, 18 March 2015


So many baked pasta dishes can turn out overly soggy or too dry only because the proportion of various ingredients doesn’t always work out the way we hoped.  This recipe is by far the best baked pasta dish and the KEY is the unique sauciness.  The TWIST is in the 2 sauces that make this dish better than the rest.   A lot of steps but totally worth the elegant outcome! By the way, don’t calorie-count on this one.  It’s rich as it should be.


Plan to use 2.5 qt Corning ware if you have one or a 9 by 13 inch pan- feeds 4-5 people.  I like using a deep pan so lots of room for the sauce to move around.


There are 4 steps to preparing this dish. You will make 2 sauces, sauté the veggies and cook the pasta all before assembling.


Sauté 3 Italian sausages in a bit of olive oil, out of the casing until crumbly and cooked

Sauté 2 packages of sliced mushrooms until golden brown, use a bit of butter and oil (any kind works)

Use 1 package of frozen spinach, thaw and drain water as much as you can. I usually push down on a sieve with the back of a spoon. No need to cook this


Cook the rigatoni al dente and set aside.  Actually any nice “airy” pasta works.  The sauce needs place to go...


Make a luscious cheesy béchamel sauce...actually a Mornay sauce if you want to be fancy.  The KEY is to use equal parts of everything.  So, in a medium size pot...

Melt 2 tbsp of butter until bubbling and almost golden

Add 2 heaping tbsp of white flour and stir until it combines. Will be dry-ish

Add 2 cups of warmed milk and stir with a whisk until you bring it to a soft boil, it should be silky and thickened

Turn off the heat and add 1 cup of grated parmesan cheese and 1 cup of another strong cheese, ex: strong cheddar or gruyere until melted. Set aside.


Make a simple tomato and garlic sauce by using just a ½ can of diced tomatoes. Saute 3 minced cloves of garlic in olive oil. Add a few chili flakes. Then add tomatoes and any herbs you like...oregano and/or thyme work best to my taste.  Crush down the sauce with a potato masher for the right consistency. That’s it.  It doesn’t need to cook any longer.


Pre-heat oven at 350 degrees.  In a large bowl, assemble all the ingredients except the tomato sauce. Then pour the mixture into the cooking dish.  With a big spoon, drop mounds of tomato sauce on top of the pasta and don’t mix. Then, cover the top of the pasta with grated Gouda and mozzarella cheese.  More Gouda than mozz...gives a great flavour.

Bake for about 45 minutes or until it all bubbles and is browned nicely on top.  This dish is so fabulous paired with a nice “big” red wine.  You’ll need it after washing all those pots and pans!


A foil pan!? YES, a meal to go...

There is an addictive sweet and savoury aspect to this dish that’s hard to deny despite the fact that it is another rich and creamy pasta dish. This is a “one-two-three” recipe, easy and pretty quick to prepare.  A nice big Pyrex or Corning ware pan is needed although I often make this "to go" for my veggie son as is evident by the foil pan! 


Cook any “airy” pasta and set aside- rigatoni, medium shells, any pasta with holes.


In a 400 degree oven, roast 1 cubed Butternut squash for about 45 minutes. Season with olive oil, salt, pepper and the TWIST, grated nutmeg and fresh thyme.  This can be done well in advance. You can turn the pieces after 20 minutes so all sides caramelize. Set aside.


In the cooking pan, pour in the pasta, cover with about 1 cup of 15% or 35% cream, 1/2 cup of grated parmesan and about ½ cup of either chicken or vegetable stock. Shake around the pan so everything settles. Top with the roasted squash.  Cover with mozz and gruyere cheese. Drizzle a bit of olive oil on top and then bake for about 45 minutes in 350 degree oven.


It’s dreamy!

Tuesday, 17 March 2015

So simple to make, it’s almost not really cooking! A great side dish nonetheless.  You can use any vegetables you may have, really.  There is no set combination, but of course, I always veer to the Med flavours so here’s my version with Israeli couscous or orzo pasta.


Generously drizzle chunks of veggies with olive oil, salt and pepper. Either roast the veggies in the oven at 375 degrees until done ( takes a bit longer than you think) or grill on the BBQ.  Either way, let the veggies rest in a big bowl so the “zumi” flows, (the juices) which is essential for the flavour of this dish.  I like the combo of red peppers, eggplant, zucchini and red onion.  Also fun with cauliflower (so fabulous when roasted and caramelized) and cherry tomatoes.


The KEY is to combine the cooked HOT pasta with HOT veggies.  I also like to add a bit of chicken stock when I cook the pasta.  Try to have more veggies than pasta for a good ratio.  Once put together, add a bit of olive oil, lemon zest and fresh parsley. Top with loads, but loads of parmesan slivers or crumbled feta cheese ( if you can eat that stuff!)